Creating and using a lambda layer inside lambda function in NodeJS v20 — Part 1
Objective
In this multi-part post, I will try to provide you the steps of creating a lambda layer in AWS and then use that lambda layer inside a lambda function.
What is a lambda layer?
Put simply, lambda layer is a way for reusing code across multiple lambda functions. It helps to reduce the amount of repeatable codes from the lambda functions thus making the lambda functions smaller. Which speeds up the lambda invocation. For more information, please check the AWS document here.
Tech stack
For ease of use, I am going to use NodeJS to write my lambda layer and lambda function codes.
Part — 1: Goal
I want to write a JWT Verify service as a lambda layer, so that, my lambda functions can use this service as needed.
Steps
When creating a lambda layer in AWS, we only can upload a .zip file as the source code for the lambda layer. See below image for reference:

And the contents of this .zip file must follow a specific structure depending on the runtime . More details here
Now, as we have decided to use NodeJS v20.x. So let’s start by creating our folder structure first. Execute the commands below in sequence using your preferred terminal.
1. cd <your_project_root_dir>

2. mkdir jwt_verify_layer

3. cd jwt_verify_layer

4. mkdir nodejs

5. cd nodejs

6. mkdir node_modules

7. cd node_modules
Since we want to write a JWT verification service, that means we have to write some custom code. In AWS, the NodeJS v20.x runtime by default uses ES6+ approach. Therefore, for our custom code, we can create a module folder as well.
8. mkdir custom_jwt_verify_service

9. cd custom_jwt_verify_service
Now, the custom_jwt_verify_service folder is the place where we will write our custom code. Let’s create a couple of files inside it.
10. touch index.mjs // this will work as the default entry point for our custom module

11. touch jwt-verify.service.mjs // our service class
We need to install a couple npm packages for our JWT verify service. Let’s install those now.
// we are still inside the "custom_jwt_verify_service" folder

12. npm init -y

13. npm install axios aws-jwt-verify
The npm install ... command above will create a new node_modules folder inside our current custom_jwt_verify_service folder.
With required npm packages already installed, let’s add some code to the jwt-verify.service.mjs file.
// file name: jwt-verify.service.mjs

import {CognitoJwtVerifier, JwtRsaVerifier} from 'aws-jwt-verify';
import axios from 'axios';


class JwtVerifyService {
  constructor(jwksUrl, jwtToken) {
    this.jwksUrl = jwksUrl;
    this.jwtToken = jwtToken;
  }

  async verifyJwt() {
    try {
      const jwksResponse = await axios.get(this.jwksUrl);
      if (!jwksResponse || jwksResponse.status !== 200) {
        throw new Error('Unable to get JWKS kwys');
      }
      console.log(jwksResponse);
      // TODO: jwt verification logic here
      return jwksResponse;
    } catch (e) {
      throw new Error(`Jwt verification failed. Reason: ${e}`);
    }
  }
}

export default JwtVerifyService; // MUST have a 'default' export
And for the index.mjs file, update it as below:
// file name: index.mjs

import JwtVerifyService from "./jwt-verify.service.mjs";

export {JwtVerifyService};
At this point, my folder structure looks like this:
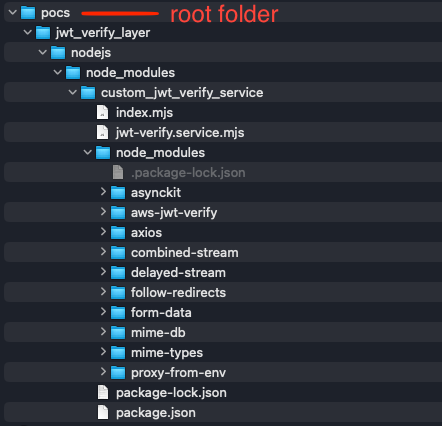
As our custom code is ready, it’s time to create a zip file for it. Creating this zip file properly is very important and it’s a bit tricky. We MUST ensure that, when we extract the zipped file, the folder structure MUST be like the below image:

That means, the first folder after extraction, must need to be nodejs folder. To create the zip file via command line, navigate back to the jwt_verify_layer folder. Then execute the below command:
14. zip -r jwt_verify_layer.zip ./nodejs

// here, -r means recurse the folders
// jwt_verify_layer.zip is the name of the zip file to be created
// ./nodejs is the folder we want to zip
The command above will generate a jwt_verify_layer.zip file. Now, to verify that the first folder after extracting this zip file is the nodejs folder, you can copy the zip file to a different location, extract it and check the extracted contents. If folder not matched, then you may need to adjust the zip command based on your folder structure.
Moving on, now we have our lambda layer code ready and zipped, it’s time to upload it to AWS. After logging into the AWS console, you can follow this guidelines to create a lambda layer. Please note that, when creating a layer, you can choose a runtime , however, it is optional. But since we are using NodeJS v20.x, go ahead and choose this runtime for your lambda layer.
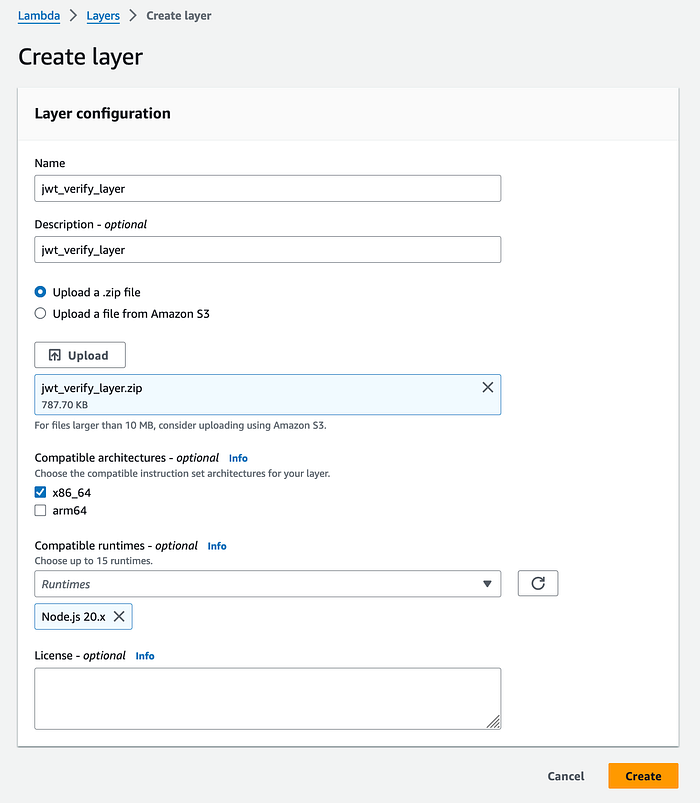
After successful creation, the lambda layer will be assigned a version number automatically. This version number is important. Because, by using this version number, we can determine which version of a lambda layer we are willing to use.
That’s it for this part. Please check out the part-2 of this series.
Thanks for sticking with me.
